Monday, December 3, 2012

Torani Syrup review and Delicious Holiday Recipe


Shespeaks.com sent me 2 full size 750 ml bottles of Torani Syrups to review and come up with recipes to go along with as part of the Torani Holiday Cheers program. The flavors I was sent were Salted Caramel and Peppermint. And since I am a simple person (a.k.a not creative when it comes to experimenting with food and drink without a already made up recipe!), I came up with 2 very simple recipes!

The First recipe is great for the Holidays. Peppermint Hot Chocolate!!! Here's what you need:
  • 1 pack of your Favorite hot chocolate
  • 1 to 2 tablespoons of Torani Peppermint syrup
  • Whipped Cream 
  • Chocolate syrup
  • Optional Peppermint candies crushed up in a Blender


Make your Hot Chocolate like you normally would. Add the peppermint syrup and stir. Squirt the whipped cream on top and the chocolate syrup and crushed peppermint for a delicious decorations. Since I didn't have any peppermint candies at home I didn't add any but I think I would be a nice touch and super delicious!!! (Gotta have the coffee house fancy schmansy-iness. Just sayin'.)

 
*don't mid the background of above photo. Only room in my house that has great lighting*
 

Second recipe is Caramel Latte. Honestly I don't know if latte is the correct term but it sounds good. More importantly It tastes really good! Here is what you need:
  • Your favorite coffee brewed like you would normally do
  • A dollop of milk (as little or as much as you want)
  • 1 to 2 tablespoons of the Torani Salted Caramel Syrup
  • Whipped cream (optional)
  • Caramel syrup and chocolate syrup (optional)


Brew your coffee the way you normally do and add milk. Add the salted caramel and stir. You don't need sugar because this is plenty sweet!

 
You could leave it like this of you could get the coffee house effect by adding whipped cream and drizzling with caramel and chocolate syrups! If you wanted to, you could add ice and make it an Iced Latte. Or for a Frappe', put coffee grounds, milk, water, Torani syrup, and ice in a blender to blend then add whipped cream and syrups on top. (I just ad lib when it comes to measurements. It's the simple girl in me so I don't have exact measurements!)
 
So here are my thoughts on the Torani products. My favorite is definitely the Salted Caramel! It is so good! It taste way better than regular caramel. It adds such great flavor to coffee drinks! Recipe 2 was definitely my favorite! I could definitely drink this everyday!
 
I liked the peppermint syrup also. And recipe one was definitely good. But I have to be in the mood to drink or eat peppermint. This drink is definitely a seasonal drink for me
 
Overall, I love the idea this syrup! It can be used in so many different things from coffee drink to alcoholic drinks to fruity drinks like lemonade to even food! There are so many flavors to choose from that you could practically use for anything that you wanted to. They have fruity flavors, baked food flavors, you name it! They have the regular syrups and Sugar free syrups. Some of the flavors I'm looking forward to try are Blue Raspberry, Pumpkin Spice, and Cinnamon Vanilla!
 
The syrups are super affordable. Price points:
  • 750 ml bottle, the cost is $7.95 (before tax)
  • 3 pack (3 x 750 ml) is $22.05
  • 12 pack (12 x 750 ml) is $83.40
     
 To purchase just go to www.torani.com. There you can check out all the flavors they have. You can buy in stores. I live in Georgia and select Walmarts and Cost Plus World Markets carry it here. But None near where I live. The website has a store locator so you can check if there are any stores near you that carry these products.

Overall I highly recommend! Great for kitchen novices (like me) and experts! This would also make great Christmas or Birthday presents too!

Please let me know if you have tried these products or are going to try them! I'd love to see what kind of recipes you come up with!!!

*This is a sponsored post. I was sent these products to review and blog about by SheSpeaks.com! This is 100% my HONEST opinion! I was not paid to write this review! I was only sent these items!*


Sunday, April 1, 2012

Review: Simple Hydrating Light Moisturizer

I want to thank http://www.shespeaks.com/ for sending me this product for free to review!


A little bit about this product. According to the company, Simple Hydrating Light Moisturizer has:
  • Light silky formulas that provides all-day nourishment and moisture
  • Added vitamins: Pro-Vitamin B5 (aka pantothenic acid which helps treat acne and helps to soften and soothe dry skin) and Vitamin E (an antioxidant that helps protect the fatty acids in your skin against free radicals from stress, pollutants, and smoking. Also can help protect against UV radiation. Helps to destroy damaged skin cells.)
  • Glycerin (a known Humectant, which keeps water in your skin therefore keeping you moisturized) and Borage Seed Oil (Comes from the Borage Flower. Contains gamma linolenic acid which helps to maintain radiant skin. Works with the body to make the hormone Prostagladin which has anti-inflammatory properties. Also protects skin from damage and regulates water loss)
  • Product has no dyes, artificial perfumes, or harsh irritants to upset the skin

Pictures Below:
{[WARNING: No Makeup On!!! This is me actually putting on the product!]}


I have to say I was surprisingly pleased with this moisturizer. I have combination/ oily, sensitive skin. So I have trouble finding products that don't irritate my skin and/or aren't too heavy. (I really don't like the feeling that a product is sitting on my skin instead of absorbing into it!)  I have tried moisturizers that are "formulated" for sensitive skin. I have also tried product that are supposedly "lightweight." I've tried high-end and drug store and I haven't found one that I truly like!

I have been trying this out for a few weeks now. I have noticed that my skin is truly hydrated. I've been getting less breakouts which I'm pretty sure was due to the lack of moisture. It doesn't feel heavy on my skin. This product absorbs pretty quickly! And my skin doesn't get as oily in the T-zone anymore (also another issue I contribute to lack of moisture.) It is super lightweight, which I love!

I use this in the morning before I apply my makeup. This acts as my primer. Through out the day, I notice that my foundation doesn't slide around. I don't look like a grease ball in my t-zone. I also apply this at night. (Probably obvious but in case you wanted to know.)

Overall I am very happy with this moisturizer! Its great for sensitive skins. Also great for combination and oily complexions. You could probably use this if you have dry sky but not if it's overly dry! I love that it is truly lightweight! I love how my skin feels after using this product! I will definitely be purchasing this again!

******All scientific info in this post is from http://www.ehow.com/*******

Thursday, January 12, 2012

E.L.F Eyes Lips Face product review and swatches: Mineral Eyeshadow


Just wanted to start off saying Happy New Year, even if it's a little late. It's still January so I say it counts! :P


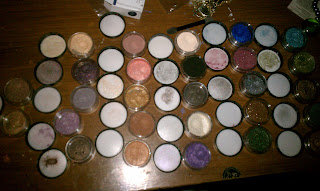
I recently bought all 27 shades of the Mineral Eyeshadow from E.L.F when the website was doing their half off of their favorites. I have heard so much about this brand all over the place from magazines to youtube videos. So I was super excited to get thede in the mail. Over all I really like this eyeshadow a lot. And for $3, it's a really good bang for your buck!


Here is what I like about this product. It's super affordable. These shadows are highly pigmented. There is a good selection of shades. What I don't like is there are not very many matte finishes. There are only 6. I wish there was a great brown shade that was matte for the crease. The matte shades that they do have are very chalky which you'll see in the swatches. Other than that, they eyeshadows blend nicely, which is great.

Swatches


From top left to bottom right: Beachy, Glamourous, Smoldering, Wild, Outdoorsy, Dream, Earthy, Caffeinated, Partier, and Sassy


From top left to bottom Right: Temptress, Sweet, Golden , Enchanting, Natural, Innocent, Seductive, Socialite, Angelic, and Flirty


Left row (Vertical) top to right row (Vertical) bottom: Elegant, Royal, Mysterious, Girly, Confident, Trendy, and Celebrity.

Here is the look I was wearing today with these shadows:


What I'm wearing:
Highlighter: Angelic
Lid: Mysterious, Celebrity, and Trendy
Crease: Enchanting and Trendy
Outer V: Confident

Once again, I love this product. And I will be able to create so many looks. My favorite shades are Mysterious, Temptress, and Socialite. I give it a 4 out of 5since there isn't a great matte brown shade for the crease. Other than that, if you get a chance, check out this product. There are so many great shades to choose from. 

I hope 2012 is filled with many great opportunities and happy moments! Happy 2012!!!


Wednesday, November 30, 2011

Randomness: Sephora Wishlist!


I went to the Sephora Website.  And I saw this above image. If you click on it, it takes you to their facebook page where you can create a wish list that you can enter to win $100 gift card! Fun right!?

I thought this was a fun way to let everyone know what you wanted for Christmas...or any of the holidays that are being celebrated around this time of year! For me, it's items that I really want but can't get right now for various reasons. It's also items that I'm not going to necessarily ask my family to get me either.

This is a plus for me because my friends and family follow me on Facebook and they can check out my wish list. Whether I get some or all these items or not, I just feel like it is something fun! Who knows, you or i may be one of the daily members to win the $100 gift card!

Happy late night randomness to you!

****This is not sponsored! It is just something that I did that I thought would be fun to see what **** everyone wished for. Image is from the Sephora website homepage

Tuesday, November 22, 2011

Review: Maybelline Great Lash Lots of lashes!

Wow! It's been a while since I've posted! Life gets very busy sometimes! But I'm back! I wanted to do a review for this post! Maybelline Great Lash Lots of Lashes Mascara!


So this is a great product. I have sensitive eyes and a lot of eye products tend to make my eyes water and even itch, especially mascaras. I don't have that problem with this product. It is a very black mascara, which I like. This product doesn't flake at all after hours of wearing. It's not water proof so if you cry it won't stay in place. 

What did it do for my lashes? It didn't clump my lashes too bad. Since it is very wet, it does clump a little bit but not too bad. It made my lashes look thicker and a little longer. My only problem with this mascara is that it is very wet. If you aren't careful, it does tend to get everywhere. I have long lashes and I sometimes get it on my eyelids, which is annoying. But other than that, I love this mascara. It's very affordable.

Monday, October 31, 2011

Happy Halloween! Venetian Mask!


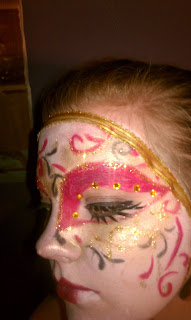
For Halloween I decided to try doing my own version of a Venetian Mask using makeup. I don't normally do anything for Halloween but since I knew that I would be taking my little sister trick or treating, I decided to do this. It was really fun to do. A little time consuming but fun. (The first picture below was the one I tried duplicating.)


What I used:
  • Glue Stick
  • White Eyeliner
  • Concealer
  • Halloween Face Paint from Walmart.
  • Baby Powder
  • Gold Halloween glitter from Walmart.
  • Fake Eyelashes from Walmart
  • 120 Eyeshadow Palette 3rd Edition from BH Cosmetics (Red and Black Eyeshadow)
  • 88 Eyeshadow Palette Cool Shimmer & Tropical Shimmer from BH Cosmetics (Gold, Yellow Gold, White)
  • Gold Ribbon from Walmart
  • Black Liquid Eyeliner

First I concealed my eyebrows. Take the glue stick and rub a thick amount back and forth over eyebrows to really get glue on eyebrows. Pat down so that the eyebrows are sticking to skin and its slick. Don't want any loose strands sticking up. Then use some concealer to conceal the eyebrows.

Take a white eyeliner pencil and outline the shape of your mask and eye holes. Fill in with white face paint (including lips) and set with baby powder. Using the eyeshadow, start creating your designs. I used a concealer brush, and angled eyeliner brush and Q-tips to draw my design. I drew my eye detail first then colored then did the gold shading around my eyes using different shades of gold. Then  did the detailing. Since I only had loose glitter, I used eyelash glue to keep the glitter on my face and to help create the "checkered" detail below eyes. Some rhinestones came with the glitter and I also used eyelash glue to attach that. I glued the ribbon on the edge to give it that "mask" feel. I also used eyelash glue because I ran out of glue stick. I would highly recommend not using eyelash glue, especially around the hairline because it wasn't fun removing the ribbon!

All in all it was an easy look to do. Let me know what you think! Happy Halloween!!!:D

Tuesday, October 18, 2011

Easy Dinner: Home-Made Individual Pizza


Who doesn't love pizza? It is one of the most popular foods ever! Most people order pizza out and who knows how unhealthy it is. But its so good! So since I am all about simple and easy, I have a simple and easy recipe for you. You control the ingredients.

Here's what you need. Makes 4 servings:
~ 1 can of biscuits
~ A bag of shredded mozzarella cheese or your choice of cheese
~ Any kind of toppings you like. (Might I reccomend pineapple, red onions, and green pepper)
~ Flour
~Spaghetti sauce

Preheat oven at 375. Take the flour and pour a generous amount in a bowl or plate. Then open the can of biscuits and seperate each of them. Take a biscuit and put it in the flour. Start flattening the biscuit and flip over to get flour on each side. Place on bakins sheet. Spoon out desires amount of sauce. Put desired amount cheese and toppings. I find that if you use pepperoni get the mini ones. Place in oven and bake for about 15 minutes or until biscuits are a golden color and cheese is melted!!!

Super easy and super yummy! Hope you enjoy.