Wednesday, November 30, 2011

Randomness: Sephora Wishlist!


I went to the Sephora Website.  And I saw this above image. If you click on it, it takes you to their facebook page where you can create a wish list that you can enter to win $100 gift card! Fun right!?

I thought this was a fun way to let everyone know what you wanted for Christmas...or any of the holidays that are being celebrated around this time of year! For me, it's items that I really want but can't get right now for various reasons. It's also items that I'm not going to necessarily ask my family to get me either.

This is a plus for me because my friends and family follow me on Facebook and they can check out my wish list. Whether I get some or all these items or not, I just feel like it is something fun! Who knows, you or i may be one of the daily members to win the $100 gift card!

Happy late night randomness to you!

****This is not sponsored! It is just something that I did that I thought would be fun to see what **** everyone wished for. Image is from the Sephora website homepage

Tuesday, November 22, 2011

Review: Maybelline Great Lash Lots of lashes!

Wow! It's been a while since I've posted! Life gets very busy sometimes! But I'm back! I wanted to do a review for this post! Maybelline Great Lash Lots of Lashes Mascara!


So this is a great product. I have sensitive eyes and a lot of eye products tend to make my eyes water and even itch, especially mascaras. I don't have that problem with this product. It is a very black mascara, which I like. This product doesn't flake at all after hours of wearing. It's not water proof so if you cry it won't stay in place. 

What did it do for my lashes? It didn't clump my lashes too bad. Since it is very wet, it does clump a little bit but not too bad. It made my lashes look thicker and a little longer. My only problem with this mascara is that it is very wet. If you aren't careful, it does tend to get everywhere. I have long lashes and I sometimes get it on my eyelids, which is annoying. But other than that, I love this mascara. It's very affordable.

Monday, October 31, 2011

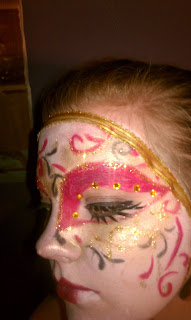
Happy Halloween! Venetian Mask!


For Halloween I decided to try doing my own version of a Venetian Mask using makeup. I don't normally do anything for Halloween but since I knew that I would be taking my little sister trick or treating, I decided to do this. It was really fun to do. A little time consuming but fun. (The first picture below was the one I tried duplicating.)


What I used:
  • Glue Stick
  • White Eyeliner
  • Concealer
  • Halloween Face Paint from Walmart.
  • Baby Powder
  • Gold Halloween glitter from Walmart.
  • Fake Eyelashes from Walmart
  • 120 Eyeshadow Palette 3rd Edition from BH Cosmetics (Red and Black Eyeshadow)
  • 88 Eyeshadow Palette Cool Shimmer & Tropical Shimmer from BH Cosmetics (Gold, Yellow Gold, White)
  • Gold Ribbon from Walmart
  • Black Liquid Eyeliner

First I concealed my eyebrows. Take the glue stick and rub a thick amount back and forth over eyebrows to really get glue on eyebrows. Pat down so that the eyebrows are sticking to skin and its slick. Don't want any loose strands sticking up. Then use some concealer to conceal the eyebrows.

Take a white eyeliner pencil and outline the shape of your mask and eye holes. Fill in with white face paint (including lips) and set with baby powder. Using the eyeshadow, start creating your designs. I used a concealer brush, and angled eyeliner brush and Q-tips to draw my design. I drew my eye detail first then colored then did the gold shading around my eyes using different shades of gold. Then  did the detailing. Since I only had loose glitter, I used eyelash glue to keep the glitter on my face and to help create the "checkered" detail below eyes. Some rhinestones came with the glitter and I also used eyelash glue to attach that. I glued the ribbon on the edge to give it that "mask" feel. I also used eyelash glue because I ran out of glue stick. I would highly recommend not using eyelash glue, especially around the hairline because it wasn't fun removing the ribbon!

All in all it was an easy look to do. Let me know what you think! Happy Halloween!!!:D

Tuesday, October 18, 2011

Easy Dinner: Home-Made Individual Pizza


Who doesn't love pizza? It is one of the most popular foods ever! Most people order pizza out and who knows how unhealthy it is. But its so good! So since I am all about simple and easy, I have a simple and easy recipe for you. You control the ingredients.

Here's what you need. Makes 4 servings:
~ 1 can of biscuits
~ A bag of shredded mozzarella cheese or your choice of cheese
~ Any kind of toppings you like. (Might I reccomend pineapple, red onions, and green pepper)
~ Flour
~Spaghetti sauce

Preheat oven at 375. Take the flour and pour a generous amount in a bowl or plate. Then open the can of biscuits and seperate each of them. Take a biscuit and put it in the flour. Start flattening the biscuit and flip over to get flour on each side. Place on bakins sheet. Spoon out desires amount of sauce. Put desired amount cheese and toppings. I find that if you use pepperoni get the mini ones. Place in oven and bake for about 15 minutes or until biscuits are a golden color and cheese is melted!!!

Super easy and super yummy! Hope you enjoy.

Skincare 101: Acne Treatment


This is a simple recipe for acne that I have come across. It s super easy and it works. The best part about it s that it is 100% natural and it is made from ingredients most likely on your spice rack. This is the Honey and Cinnamon spot treatment!

Honey and Cinnamon...that's all you need. All you do is take a small bowl or container (the smallest you can find), and add the honey. Then sprinkle in the cinnamon.  Mix it together. (You want to add enough to make it into a paste.) Once it's mixed to a paste consistency you want to put some on your pimples and leave on for about 15 minutes. Wash it off thoroughly with warm water. Do NOT leave it on all night. It will dry out the pimple and kill any bacteria.

If you want you can make enough to rub on your whole face as a mask. Leave on for 15 minutes and wash off with warm water. You can also make enough for later uses. Just store it in the fridge. It should be good for about 2 weeks.

Cinnamon is an antioxidant which will help fight free radicals and other pollutants. It also has antimicrobial properties that help fight bacteria and other germs. Honey is an antibacterial to fight bacteria.

***Just a disclaimer: I just want to put it out there that I am not a doctor or dermatologist. This is something that I have used and have been very pleased with the results. If you are allergic to honey or cinnamon, then I would not use this on your face.***

Friday, October 14, 2011

Easy Peazy Tinted moisturizer


There are days when I don't want to wear makeup. Mostly because I'm feeling lazy and I find it a little tedious on those days. I tend to break out very easily and I want a little a littl bit of coverage. That's where the tinted moisturizer comes.

I don't ever really think to buy a tinted moisturizer when I am out purchasing makeup. Really what's the point when you can do it yourself when you already have what you need at home. Here's what you need!

~ Your favorite moisturizer
~ Your favorite Foundation

All you have to do is mix a little bit of moisturizer and foundation together and you have a tinted moisturizer. With the foundation you can use as little or as much foundation as you want to create the coverage you want. Since their is moisturizer, it won't give you the foundation cakey look. It makes it more sheer. You still want to exfoliate 1 to 2 trimes a week because it will emphasize any flakiness.

If you want to, after you put on the moisturizer, you can still use a little bit of concealer to cover up anything that need to be covered. All a tinited moisturizer does is moisturizes and give a little bit of coverage on those days you don't want to wear a ton of makeup!

Hope this was helpful. Have a fabulous Friday!!!:D

Wednesday, October 12, 2011

Storing your jewelry on a budget!

These days, with the economy the way it is, we all need new ideas and ways to save money! All you need are:

 ~ Cork Board- I bought a medium sized one at Walmart for about $6 ( Depending on how much jewelry you have, you might need more than one. )
~ Push Pins- Get it at any place that sells office supplies.
~ Open wall space!

Super easy-peazy!

All you have to do is pin however many pins for you necklaces on your wall in whatever order you would like.


I had a small space between my door and my closet. I mostly alternated short and long necklaces to fit all my necklaces on the wall. The middle is pinned straight and the rest are worked around it! If the necklaces had matching earrings, I put those with the necklaces. I'm not picky about color coordinating everything nut if you want to you can. Be creative! I encourage it!!! :D

This is my earring storage down below. Everything with the packaging is on the outer parts of the cork board. Everything else in the middle! Once again, not color coordinated but it works for me!


With this system, everything is out in the open so you can see it! Before, I had everything in a big shoe box. I never really remembered to grab some jewelry. When I did, it was a pain in the tuckus to dig through the box to find what I was looking for. Jewelry would get broken or paint would scratch off due to rubbing together. This way nothing gets broken and ruined!

If you have any ideas on how to store rings and bracelets let me know! I would also love to see how you store your jewelry! Post your comments below! Can't wait to read them!!!

Have a jeweltastic day!!!:P